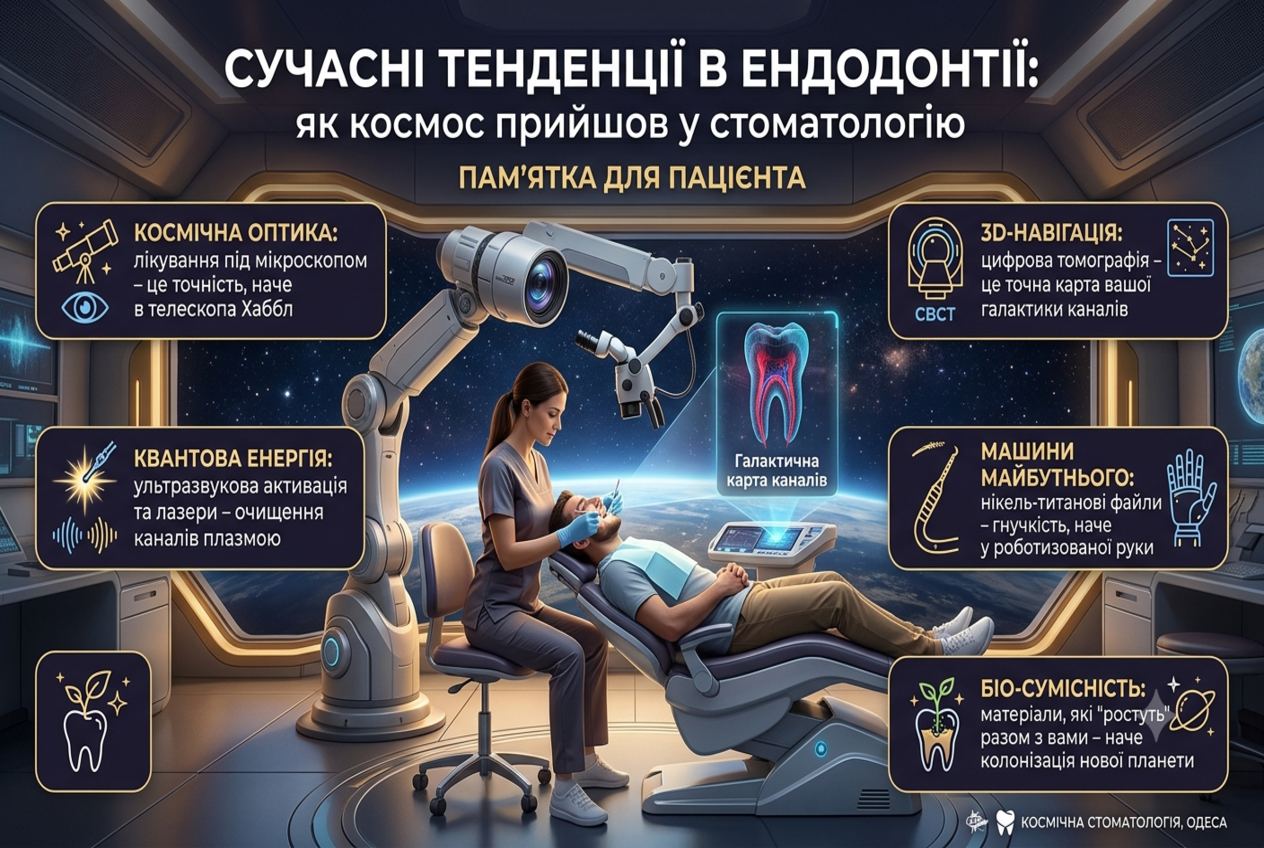
Modern Trends in Endodontics: How Space Age Technology Came to Dentistry. A Patient’s Guide
The phrase “you need a root canal” used to sound like a death sentence, often associated with multiple circles of hell, arsenic, and excruciating pain. Fortunately, those times are long in the past. Today, endodontics (the art of treating the inside of a tooth—the pulp and root canals) resembles a high-tech space mission. Thanks to new technologies, even teeth that were previously considered hopeless are now successfully saved.
Key Trends in Modern Endodontics: What Makes Treatment Effective?
A modern endodontist no longer works “blindly.” Their arsenal has changed beyond recognition:
- Treatment under a microscope: The golden rule of modern dentistry is: “You cannot treat what you cannot see.” A dental microscope magnifies the working field by 20–30 times and provides powerful lighting, which allows the doctor to find hidden canals, safely remove fragments of old instruments, and perfectly close perforations.
- “Smart” and flexible instruments (Nickel-Titanium files): Modern instruments are made from a special nickel-titanium (NiTi) alloy with shape memory. They are incredibly flexible, follow the most complex anatomical curves of the canal, and are controlled by a special endomotor that monitors rotation torque itself to prevent the instrument from breaking.
- Ultrasonic and laser irrigation: To flush out canals, antiseptics are used, which are activated by ultrasound or lasers. The liquid literally “boils” and blasts infection out of the smallest nooks, ensuring 3D cleaning.
- Three-dimensional obturation (Hot gutta-percha): The standard today is filling the canal with heated gutta-percha under pressure. It fills absolutely all anatomical voids and micro-canals, leaving no room for bacteria to survive.
- Bioceramics: To treat inflammation, bioceramic sealers are now applied. These are smart materials that the body does not perceive as foreign; they have an antibacterial effect and stimulate the restoration of the patient’s own bone tissue.
Patient’s Guide: The Essentials
To ensure your root canal treatment goes perfectly and your tooth lasts for many more years, remember a few simple rules.
When should you run to an endodontist?
- Spontaneous pain: the tooth begins to ache strongly or throb on its own, especially at night.
- Pain when biting: it feels as if the tooth has “grown” and it is painful to put pressure on it.
- Prolonged reaction to hot: if the tooth starts to hurt from a hot drink and the pain does not subside for several minutes (a classic sign of pulpitis).
- The appearance of a “pimple” on the gums (fistula) or swelling of the cheek.
How should proper treatment be conducted?
- Only with anesthesia: Modern root canal treatment is a completely painless procedure.
- Use of a rubber dam: A special rubber sheet isolates the tooth being treated from the rest of the mouth. It protects your airways from irrigation solutions and the tooth canal from bacteria in your own saliva. Today, root canal treatment without a rubber dam is considered a serious violation of protocol.
What to do AFTER root canal treatment?
- Normal reaction: The tooth may hurt when biting for 2–5 days after treatment. This is the so-called “post-filling syndrome” (a reaction of the tissues around the root to the intervention). Take the pain reliever recommended by your doctor.
- Mandatory restoration: A “dead” tooth becomes brittle. Therefore, the standard for an endodontically treated tooth is covering it with a crown or a ceramic overlay; otherwise, the tooth wall may break off.
Latest Standards in Dental Fillings: Modern Methods and Technologies
The field of dentistry is developing extremely fast. What was considered a standard ten years ago is now giving way to minimally invasive and high-tech solutions. Modern filling is no longer just “closing a hole” in a tooth, but a full-fledged artistic and functional restoration.
1. Priority of Biocompatibility: Refusing Amalgam
Today, the global dental community has almost completely abandoned silver amalgam. Modern standards are based on the use of materials that have high biocompatibility and the ability to adhere (bond) to tooth tissues.
- Photopolymer Composites: This is the “gold standard.” They allow the doctor to work with the material for as long as needed to recreate the anatomy of the tooth, as they harden only under the influence of a special lamp.
- Ormocers: A new generation of materials based on organically modified ceramics. They have minimal shrinkage and contain no free monomers, making them ideal for allergy sufferers.
2. Microscopic Precision
The use of a dental microscope has become a mandatory requirement for high-quality filling.
- Minimal Invasiveness: The microscope allows the doctor to see the boundary between healthy tissue and caries, removing only the damaged areas. This preserves the strength of the tooth.
- Hermeticity: Under high magnification, the dentist can perfectly adapt the material to the edges of the cavity, which eliminates the appearance of micro-cracks and secondary caries.
3. 3D Printing and CAD/CAM Technology
If tooth destruction is significant (over 50%), standard filling is replaced by ceramic inlays made using digital technologies.
- Intraoral Scanning: Instead of unpleasant impressions, a digital scanner is used.
- Modeling: A computer program creates an ideal model of the future restoration.
- Milling: A robotic machine mills the inlay from a solid block of zirconium dioxide or pressed ceramic. Such a “filling” lasts 3-4 times longer than a regular one.
4. Adhesive Protocols and Isolation
Modern filling is impossible without a rubber dam (latex sheet). It isolates the working field from the patient’s breath and saliva.
- Reliable Bonding: The latest generation of adhesives (dental glue) requires an absolutely dry surface. This is the only way to guarantee that the filling will not fall out in a year.
- Gum Protection: Materials do not contact the mucous membrane, which prevents chemical burns and inflammation.
The Future: Bioactive Materials
The latest trend is the development of “smart” fillings that release fluoride, calcium, and phosphates over a long period. This promotes remineralization of the tooth around the filling, literally strengthening it from the inside and preventing recurring destruction.
Today, a visit to the dentist is about comfort, aesthetics, and durability. Thanks to new standards, a properly installed restoration is visually indistinguishable from natural enamel and can last for decades.
Caries Diagnosis: Everything a Patient Needs to Know About Modern Methods
Caries is a treacherous enemy. It does not appear overnight and does not always announce itself with sharp pain. Patients often follow the iron rule: “If it doesn’t hurt, don’t touch it.” However, in the case of teeth, this rule only works to increase the cost of your future treatment. When pain appears, it is no longer about a simple filling, but about root canal treatment (pulpitis).
Modern dentistry is focused on micro-invasiveness: detecting the problem at an early stage and preserving as much healthy tooth tissue as possible.
Why is a simple mirror examination no longer enough?
Previously, diagnosis looked simple: the doctor would look at the tooth with a mirror, poke it with a sharp probe, and if it got stuck somewhere, they would deliver a verdict. Today, this method is considered outdated and even dangerous, as the probe can damage weakened enamel that might otherwise have recovered (remineralized).
Furthermore, caries loves to hide in hard-to-reach places:
- In fissures — natural depressions on the chewing surfaces (while the enamel on the surface may appear completely intact).
- Between teeth (contact caries) — the most insidious type, which is often noticed only when a tooth wall simply breaks off while eating.
- Under old fillings and crowns (secondary caries).
Top diagnostic methods in a modern clinic
Today, a dentist is somewhat of a detective with a bunch of gadgets. Here is what helps doctors see the hidden:
- Digital radiography and 3D tomography (CT)
This is the “gold standard.” On a computer screen, a doctor can clearly discern the internal structure of the tooth. An X-ray will show caries between teeth at a stage when it is not yet visible, while a CT scan allows for assessing the depth of the lesion and the condition of the tissues around the root. - Dental microscope and loupes
Optics increase the working field by 10–20 times. The doctor uses special binocular glasses. This allows them to notice micro-cracks in the enamel, detect initial demineralization (a “white spot”), and check the fit of an old filling to see if there are micro-gaps where bacteria can accumulate. - Laser fluorescence (DIAGNOdent)
The device illuminates tooth tissues with a laser. Healthy enamel and damaged enamel reflect light waves of different lengths. The device analyzes this and provides a digital index: the doctor knows exactly whether it is just pigmentation (which does not need to be touched) or if it is already caries. - Caries markers
These are special safe organic dyes. The doctor applies them to the teeth during treatment or an examination. The marker stains only the dentin destroyed by bacteria and is easily washed off healthy tissues. This helps the dentist not remove excess tissue during drilling.
Warning signs: when to run to the doctor?
Do not wait for a scheduled visit if you notice at least one of these symptoms:
- Reaction to irritants: short-term pain or a “tingling” sensation from cold, hot, sweet, or acidic foods that disappears immediately after the source is removed.
- Problems with floss: if during the cleaning of interdental spaces, the dental floss constantly gets caught on something, breaks, or shreds.
- Visual changes: the appearance of chalky (matte-white) or dark spots on the enamel.
- Bad breath: an unpleasant odor from the mouth that does not disappear even after thorough brushing.
Important: Modern diagnostics is a fast, painless, and highly accurate process. A preventive check-up every six months using optical and digital methods will allow you to “catch” caries at a stage when its treatment requires a minimum of time and money.
Modern Pediatric Dentistry: No More Fears
A decade ago, a visit to the dentist was often associated with the noise of a dental drill and fear. However, in 2026, pediatric dentistry has transformed into a space of high technology where psychological comfort and painlessness are the top priorities.
Key Treatment Innovations
- Psychological Adaptation: The use of the “Tell-Show-Do” play model and VR glasses, which allow the child to watch cartoons during the procedure.
- Drill-Free Treatment: Technologies like Icon (sealing caries with a gel) and laser dentistry ensure the removal of affected tissues without vibration or noise.
- Digital Diagnostics: Replacing unpleasant impressions with fast and comfortable 3D oral scanning.
- Computer-Assisted Anesthesia (STA): Designed to look like a pen, it delivers medication drop by drop, so the child does not feel the moment of injection and avoids the “numbness” effect that lasts for hours.
- Medicated Sleep (Sedation): A safe method for complex procedures or treating very young children, allowing them to “fall asleep” and wake up with healthy teeth.
Why is the First Visit Important?
| Recommendation | Result |
|---|---|
| Introductory Visit | Stress reduction, getting used to the chair and the doctor. |
| Regularity | Preventing pain and the need for complex treatment. |
Advice to Parents
Don’t wait until your child has a toothache. Let their first meeting with a dentist be a pleasant adventure. Remember: modern dentistry is not scary; it is interesting and safe for your child!
Braces or Aligners: Which to Choose for a Perfect Smile?
Today, straight teeth are not just a matter of aesthetics but also a guarantee of overall body health. When it comes to correcting a bite, patients usually choose between two favorites: classic braces and modern aligners. Each method has its own “superpowers,” so let’s figure out what is right for you.
1. Braces: The Tried-and-True Classic
These are fixed structures attached to the teeth. They can be made of metal (the most reliable), ceramic, or sapphire.
- Pros: Versatility for complex cases, continuous treatment, and more affordable pricing for metal models.
- Cons: Require special hygiene, dietary restrictions apply, and they are visible on the teeth.
2. Aligners: Invisible Comfort
A series of clear trays made from an individual 3D mold, replaced every 1–2 weeks.
- Pros: Esthetic appeal, convenience (removable while eating), and predictable results thanks to digital planning.
- Cons: Require high discipline (must be worn 22 hours a day) and are not suitable for extremely complex pathologies.
Comparison Table
| Characteristic | Braces | Aligners |
|---|---|---|
| Visibility | Visible | Almost invisible |
| Hygiene | Complex | Standard |
| Diet | Restrictions apply | No restrictions |
Important Advice
The final decision always rests with your orthodontist. Only after an X-ray and examination can it be determined which system will work faster and more effectively in your specific case. Take the first step toward a consultation today!
All-on-X: Complete Smile Restoration in One Day
The loss of most or all teeth is not just an aesthetic issue, but a serious challenge for your health and quality of life. The All-on-X technology (where “X” is the number of implants: 4, 6, or more) has become the “gold standard,” allowing for the restoration of jaw functionality as quickly and comfortably as possible.
What Is All-on-X?
This is a prosthetic method where a fixed full-arch bridge is secured on just a few dental implants. The most popular options are:
- All-on-4: A classic protocol where two implants are placed vertically in the frontal region, and two are placed at an angle in the posterior sections.
- All-on-6: Provides higher stability and better distribution of chewing load thanks to two additional support points.
Key Advantages of the Technology
- Immediate Loading: You can receive a temporary fixed prosthesis as early as the day of surgery. No more waiting months for healing.
- No Bone Grafting: By placing implants at an angle, the doctor uses existing bone volume, avoiding complex surgical procedures.
- Natural Appearance: The design does not cover the palate, does not shift while eating, and looks just like your own teeth.
- Durability: Titanium supports serve for decades, preventing further bone tissue atrophy.
Treatment Stages
| Stage | Description |
|---|---|
| 1. Diagnostics | CT scan, 3D modeling, and gum condition assessment. |
| 2. Surgery | Placement of implants (4–6) under anesthesia. |
| 3. Prosthetics | Fixation of a temporary adaptive prosthesis. |
| 4. Finale | Replacement with a permanent prosthesis after 4–6 months. |
Who is it for and Final Note
This method is ideal for patients with complete edentulism or advanced periodontal disease. Important: There are contraindications, so a consultation with an implant surgeon is necessary. All-on-X is not just treatment; it is an investment in your confidence and the ability to enjoy life without limitations!
All-on-X Prosthetics: A New Smile in One Day
The loss of a significant number of teeth or complete edentulism is a challenge that concerns not only aesthetics but also general health and self-confidence. Modern dentistry offers a revolutionary solution — the All-on-X concept (ranging from All-on-4 to All-on-6 and beyond).
What Is All-on-X Technology?
The All-on-X method is a full-mouth rehabilitation protocol where a fixed prosthesis for the entire jaw is secured on a specific number of implants. The main feature is the strategic placement of the supports: two are placed vertically in the frontal region, while others are placed at an angle of up to $45^\circ$ in the posterior sections. This allows for reliable fixation of the construction even in cases of bone deficiency, avoiding complex bone grafting surgeries.
Key Advantages of the Method
- Speed: In most cases, the patient receives a temporary fixed prosthesis on the day of surgery or within 2–3 days.
- Aesthetics and Comfort: The prosthesis looks like natural teeth, does not cover the palate, and does not affect speech or taste sensations.
- Reliability: Even distribution of chewing load prevents further bone atrophy.
- Cost-Effectiveness: A lower number of implants compared to classical methods reduces the overall cost of treatment.
Differences Between All-on-4 and All-on-6
| Method | Features |
|---|---|
| All-on-4 | A classic option for patients with sufficient bone volume. |
| All-on-6 | Recommended for high loads or significant bone resorption to ensure maximum stability. |
Treatment Stages and Expert Advice
The process includes diagnostics (CT scan), implant placement, fixation of an adaptive prosthesis, and final restoration (after 4–6 months). Important: The method has contraindications, so the first step should always be a consultation with an experienced implant surgeon. All-on-X is not just treatment; it is a return to a full life without limitations!
Basic Rules for At-Home Dental Care
A healthy smile is not just a matter of aesthetics but also an important indicator of overall health. Most dental and gum problems can be prevented with proper and regular at-home care. Here are the main recommendations to help keep your teeth strong and your breath fresh.
1. Brushing Technique and Regularity
- Schedule: Teeth should be brushed twice a day: in the morning after breakfast and in the evening before bed.
- Time: The process should last at least 2–3 minutes.
- Technique: Forget about horizontal scrubbing. Use “sweeping” motions from the gum toward the edge of the tooth, holding the brush at a 45-degree angle.
2. Choosing Hygiene Products
The right tools are the key to success:
- Toothbrush: Change it every 3 months. Choose the bristle firmness (soft or medium) based on your gum sensitivity.
- Toothpaste: Choose products containing fluoride (for enamel strengthening) unless advised otherwise by your doctor.
- Tongue: Use a special scraper or the back of your toothbrush to remove odor-causing bacteria.
3. Interdental Spaces
A regular toothbrush misses 30–40% of tooth surfaces, so additional tools are mandatory:
| Tool | Purpose |
|---|---|
| Dental Floss | For tightly spaced teeth. |
| Interdental Brushes | For wider gaps and braces. |
| Water Flosser | Cleansing with pressurized water. |
Expert Advice
Even perfect at-home care is not a substitute for professional cleaning. Visit your dentist every 6 months for a check-up. Regularity and discipline are the cheapest and most effective ways to avoid complex treatment in the future!
A Radiant Smile: Types and Methods of Teeth Whitening
A snow-white smile is not just a sign of health but also an important element of self-confidence. Today, dentistry offers many options for enamel brightening: from professional in-office procedures to at-home kits.
1. Professional (In-Office) Whitening
This is the fastest and most effective way to change tooth color by several shades in a single visit:
- Photo-whitening (Luma Cool, Zoom): A special gel with a high concentration of hydrogen peroxide is applied to the teeth and activated by light (halogen, LED, or laser).
- Laser Whitening: Considered one of the gentlest methods. The laser beam acts locally and quickly, minimizing the risk of pulp overheating.
- Chemical Whitening: Uses only an active gel without the additional use of lamps. Suitable for patients with high light sensitivity.
2. At-Home Whitening Under Professional Supervision
This method combines the comfort of home with professional control:
- Custom Trays: The dentist makes an impression of your teeth and fabricates personalized trays. You fill them with a special gel (of a lower concentration than in the clinic) and wear them for several hours a day or overnight for 1–2 weeks.
3. Over-the-Counter Methods
These are the most budget-friendly but least effective options, such as whitening strips, pens, varnishes, and abrasive toothpastes (the latter only remove surface stains through friction).
Comparison Table of Methods
| Method | Time to Result | Effect (Brightening) | Safety |
|---|---|---|---|
| In-Office | 60 minutes | 8–12 shades | High |
| Custom Trays | 10–14 days | 4–6 shades | Medium |
| Strips/Pastes | From 2 weeks | 1–2 shades | Low |
Important Recommendations
Before any whitening procedure, be sure to undergo a professional cleaning and consult with your doctor. Remember to follow a “white diet” for 48 hours after the procedure and keep in mind that fillings, crowns, and veneers do not whiten—their replacement should be planned after the whitening process to ensure the correct shade is matched.
Curettage of Periodontal Pockets: Why Is It Needed and How Is It Performed?
Healthy gums are the foundation of strong teeth. However, during inflammatory processes such as periodontitis, voids called periodontal pockets form between the gums and the teeth. If they are not cleaned in time, this can lead to the loosening and loss of even healthy teeth. One of the most effective methods for solving this problem is curettage.
What Is Curettage?
Curettage of periodontal pockets is a dental procedure during which the doctor removes subgingival deposits (tartar), plaque, and infected tissue from the walls of the gingival pocket. Unlike a standard cleaning, curettage works deeper—in areas where a toothbrush or ultrasound are ineffective during a surface examination.
Types of Procedures
Depending on the depth of the pockets and the severity of the disease, dentists distinguish between two main methods:
Closed Curettage
- Performed if the depth of the pockets does not exceed 3–4 mm.
- Executed without cutting the gums using specialized instruments (curettes) or ultrasonic devices (e.g., Vector).
- The procedure reduces inflammation and promotes the “reattachment” of the gum to the tooth.
Open Curettage
- Prescribed for deep pockets (over 5 mm).
- Involves a small incision of the gum to provide full visual control and access to clean the tooth root.
- Micro-sutures are applied after the cleaning.
Results and Benefits
| Indicator | Effect After Treatment |
|---|---|
| Breath | Complete elimination of unpleasant odor (halitosis). |
| Gum Tissue | Reduction of swelling, pain, and bleeding. |
| Tooth Stability | Stopping bone destruction and strengthening loose teeth. |
Important Tip
After the procedure, it is recommended to follow a diet (avoiding spicy, hot, and hard foods) and carefully follow the doctor’s hygiene instructions to accelerate healing. If you notice bleeding gums, do not delay your visit to a periodontist!